| |
www.itsseweasytv.com |
| 307-3 | Print | Close [X] |
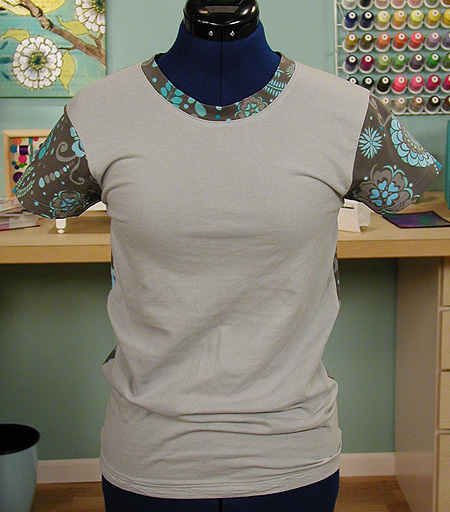
| Valori Wells shows how to deconstruct a favorite t-shirt to make your very own pattern for a perfect fit. |
For More Information Visit: www.brothersews.com |
Supplies:
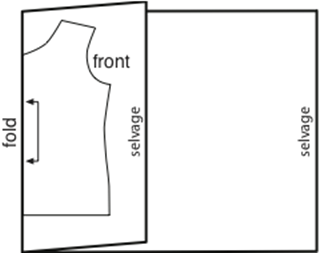
1. Use a seam ripper to carefully take apart the collar. Press collar and shirt and set aside. 2. Turn shirt inside out and carefully cut along the edge of the seam between the front and back of the shirt right next to the stitched seam and up the inside seam of the sleeve. 3. Repeat for the other side of the shirt. 4. Cut the sleeves off in the same fashion – right next to the seam. All hems are left stitched. 5. Cut shoulder seam. You will now have all your pieces: Collar, Front, Back and Sleeves. Then carefully cut off the serged edges of the seams. 6. Press all of the pieces. 7. Fold the front in half right sides together and press. Repeat with the back and the sleeve. For the ribbing measure the width and length. Add 1” to the length measurement. Draw a rectangular pattern for the ribbing. 8. Place the fold of the front against the straight edge of the paper. With a pencil, trace around the edges of the shirt. Put the shirt aside. Clean up the traced edges taking out any wobbles. Add ½” seam allowance to all edges except the hems. Add 1” for the shirt and sleeve hems. 9. Mark the center front and center back pattern pieces as seen in the illustration. Label the pattern pieces. Cut pattern pieces out of paper. 10. Refer to the illustration and pin the shirt front to the double thickness of fabric with the center line on the fold. Pin patterns on. Cut it out.
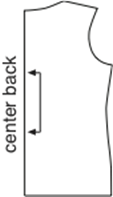
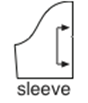
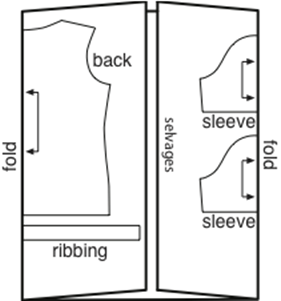
11. Refer to the illustration for the back, sleeve and ribbing. Pin patterns on and cut it out.
13. From the fusible knit interfacing, cut several pieces 2” wide across the direction with the most stretch, sometimes across, and sometimes up and down. You will need enough to go around the bottom of the shirt. 14. For the sleeves cut the interfacing 1 ½” wide across the direction with the most stretch. You will need enough to go around each sleeve. 15. Take a piece of the interfacing, and making sure that the bumpy (glue) side is against the wrong side of the fabric, press it to your hem. If one won’t go all the way around, just butt the ends together and keep pressing. 16. With the right side facing the ironing board, fold up the hem 1” form the bottom of the shirt and ¾” for the sleeves. You will sew the hems once the shirt is put together. 17. Place right sides together and stitch the shoulder seams. Press seam open. 18. Pin a sleeve to the shirt placing the fold line of the sleeve on the sleeve seam. Pin to together. Stitch together with the sleeve facing you using a ½” seam allowance. Repeat for the other sleeve. Press seam towards body of shirt . 19. Turn shirt inside out and pin from the edge of sleeve to bottom of shirt. Stitch together using a ½” seam allowance. Repeat for the other side. Press seam open. 20. Stitch together the short ends of the neck band. Press the seam open and then press the band in half length wise, with wrong sides together. Fold in half and place pins as markers. Repeat again so that you have the band marked in quarters. 21. With your shirt still inside out, fold the neck in half and pin then again so that you have the neck marked in quarters. Pin the band to the shirt, with the raw edges matched up. There will be more shirt than band. You can add more pins in between to even out the excess fabric. 22. Use a ¼” seam allowance and slowly stitch around the neck band and shirt. You can use the zig zag stitch on the edges to keep from curling. 23. Press the seam towards the body of the shirt. Top Stitch around the edge of the shirt where it attaches to the collar. Turn shirt inside out. 24. Press the hems again, half of the amount of interfacing. Using a straight stitch, sew around hem – approximately 1/8” to a ¼” from the edge. The knit does not ravel or fray so you don’t have to finish the edge. Repeat for the sleeves. 25. Press shirt and wear. For more information visit www.valoriwells.com. Featured sewing machine in this segment: Sewing Machine Featured in this Segment:
|
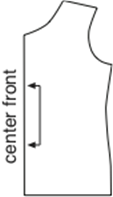
Host: Valori Wells |
| Copyright © 2015 It's Sew Easy. All Rights Reserved. |