For this pattern you will need:
1/3 Yard Fabric
1/3 Yard Iron-On Pellon 809 Craft Fuse
1/8 Yard Peltex 72F Double-Sided Fusible
2 Light Kits Ikea Januari
2 Curtain Grommets-Dritz Home
2 Light Bulbs *Warning: Use common sense when working with lighting and fabric; select a high efficiency light bulb that will not get hot!
Optional: 40” Trim, 40” of Ruffle and 40” of 1” Ribbon, and/or Eyelets
Multiple Seam Allowances
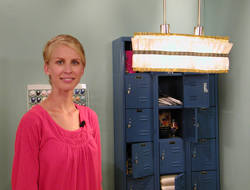
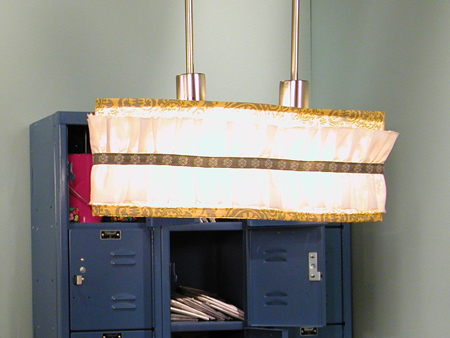
Finished Dimensions 3 ½” Deep x 6 ½” High x 19” Wide
- Prep
- Read all instructions to make sure you understand how the pattern will flow
- Cut Chandelier Fabric and Stabilizer
- Cut one piece of fabric 9” deep x 40 ½” wide
- Cut one piece of Pellon 809 Craft Fuse 9” deep x 40 ½” wide
- Attach Stabilizer
- Match corresponding fabric and Craft Fuse press into place on the wrong side of fabric
- Cut Arm Plate Fabric and Stabilizer
- Cut four pieces of fabric 4” deep x 3 ½” wide
- Cut two pieces of Peltex 72F 3 ¼” x 2 ¾”
- Create Arm Plates
- Place one piece of arm plate fabric, 4” x 3 ½” on a flat surface with right sides up
- Place a second piece of arm plate fabric on top of the first with right sides together
- Pin along both 4” sides. NOTE: No need to pin or sew the 3 ½” sides, these will be taken care of when they are attached to the chandelier.
- Sew 4” sides using ¼” seam allowance
- Repeat with third and fourth arm plate fabric pieces
- Flip fabric right side out and slip in Peltex Stabilizer. NOTE: You will have ¼” of excess fabric on each end, the stabilizer should be positioned in the center of the arm plate fabric.
- Press to secure
- Add Grommet to Arm Plate and Mark
- Find and mark the center of each arm plate
- Add grommet according to manufacturers instructions. Note: This usually involves marking where to cut using a template, then cutting and placing grommet.
- Find and mark the center of each 3” side
- Score and Press Chandelier Fabric
- Pace 9” x 40 ½” chandelier fabric with stabilizer on a flat surface with right side down
- Along the top edge measure ½” towards the center and mark the entire width, 40 ½”, with a hera marker
- Along the top edge measure 1” towards the center and mark the entire width, 40 ½”, with a hera marker
- Repeat along bottom edge
- Fold along each line and press into place
- Un-fold. Note: You are not sewing yet, but this will make it more accurate once the side seam has been sewn.
- Mark Chandelier
- Pace 9” x 40 ½” chandelier fabric with stabilizer on a flat surface with right side down
- Starting along the top left corner measure ¼” towards the center and mark
- From this point measure 6 2/3” and mark
- Continue to measure 6 2/3” until you reach the right side. NOTE: Your last mark should be ¼” away from the right edge, this is the mark designating your ¼” seam allowance you will sew in step nine. The third 6 2/3” mark, which will be opposite of the side seam this is a place marker and not a marker for an attachment piece.
- Sew Side and Bottom Seams of Chandelier
- Fold fabric in half widthwise and place the 9”sides together with right sides together
- Pin side edges together
- Sew using ¼” seam allowance
- Press seam open
- Finger press the bottom pre-pressed folds
- Sew bottom seam secure using a 3/8” seam allowance
- Add Optional Details
- Ruffle
- Two pieces of frayed ruffle starting at 40” each; then gathered to 20” each. Once secured edge stitched 1” ribbon to finish off the look.
- Trim
- One piece of trim measuring 40”; attach according to manufacturers instructions (typically sewn in or glued)
- Eyelets
- Place where it makes sense with the fabric you selected. Attach eyelets according to manufacturers instructions. NOTE: Eyelets are used to create a starry effect.
- Place Arm Plates
- Place chandelier on a flat surface with side seam along one side. NOTE: The side seam should be on either right or left side, not in the middle.
- Find one of the marks previously made, not the third mark which is a place holder
- Align the mark on one arm plate with mark on chandelier and pin into place, this should be in the fold to hide and secure the 3” side of the arm plate
- Repeat with second arm plate and mark directly next to the first arm plate. NOTE: When you first place the arm plates they should be along the same side. The mark opposite of the side seam is a place marker representing the opposite side, not a marker for an arm plate.
- Starting along one of the side marks, either side seam or mark opposite side seam, sew 3/8” seam to secure the arm plate within the top seam. NOTE: Sew only one side of the chandelier, this allows you to attach the opposite sides of the arm plate.
- Find and match the marks on the chandelier and arm plates for the remaining side
- Pin to secure
- Secure using 3/8” seam allowance
- Finishing Touches
- Steam out any wrinkles
- Attach light kit and insert light bulb
- Hang
- Enjoy!
Sewing Machine Featured in this Segment:
Innov-is 40 Project Runway Limited Edition Sewing Machine
With Zig Zag “J” Foot

|