A Pearl Louise Design
Materials Needed
1/2 Yard Main Print (Tote Body)
2/3 Yard Accent Fabric (Tote Pockets, Handles & Ties)
1 ¼ Yard Insul Shine (44” X WOF)
Fat 1/16 Applique Fabric
Fat 1/8 Yard Yo Yo Print
¼ Yard Steam A Seam 2 Lite
(Iron on Fusible Web)
1/8 Yard Warm & Natural Batting
Black Embroidery Floss
¼ Yard 1/8” White Rick Rack
Coordinating Threads
Basic Sewing Supplies
Basic Instructions
1. Read all instructions before beginning.
2. Cut all fabrics as stated. Cutting Instructions are based on 40” wide fabric.
WOF = Width of Fabric.
3. ¼” seams are allowed.
4. Press all seams.
Cutting Instructions:
1. From the Main Print, Cut:
One 12 ½” X WOF Strip
From this strip, Cut:
Two 12 ½” Squares
Three 5 ½” X 12 ½” Rectangles
2. From the Accent Fabric, Cut:
One 6 ½” X WOF Strip
From this strip, Cut:
Two 5 ½” X 6 ½” Rectangles (Pockets)
Two 6 ½” X 12 ½” Rectangles (Pockets)
Two 5 ½” X WOF Strips (Handles)
One 2” X WOF Strip (Ties)
3. From the 1 ¼ Yard of Insul Shine, Cut:
One 12 ½” X 1 ¼ Yard Strip
From this strip, Cut:
Two 12 ½” Squares
Three 5 ½” X 12 ½” Rectangles
One 6 ½” X 1 ¼ Yard Strip
From this Strip, Cut:
Two 5 ½” X 6 ½” Rectangles
Two 6 ½” X 12 ½” Rectangles
4. From the Batting, Cut:
Two 2” X 40” Strips
5. From the Yo Yo Fabric, Cut:
Five Yo Yo’s
6. Cut the appliqué motif as stated.
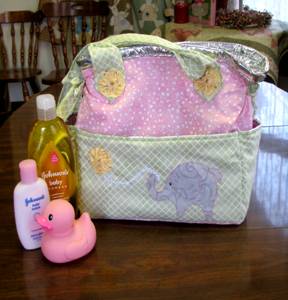
Building the Sew Sweet Baby Tote
Pockets
1. Trace the appliqué design on the wrong side of the “Sticky” side of the Steam a Seam
2 Lite product. Cut out each shape allowing a ¼” excess between each drawing.
2. Peel off the paper backing and press the appliqué shapes onto the wrong side of the
appliqué fabric. Use a steam iron to press the iron on fusible web shapes in place.
3. Cut out each shape on the drawn line.
4. Place the shapes onto the right side of one of the 5 ½” x 12 ½” Pocket Rectangles.
See Photo for suggested placement. Press the elephant appliqué shapes in place.
5. Sew a decorative stitch around each appliqué shape using a accent thread.
6. Thread a needle with one strand of 24” Black Embroidery Thread. Knot both ends
together.
7. Stitch a Colonnial or French Knot eye in place. Stitch a lazy Daisy Stitch around the
knot to frame the eye.
8. To make the yoyo accents, thread a needle with a 24” coordinating thread. Knot the
ends. Fold the outer edge of the yoyo to the wrong side about 1/8”. Stitch large
gathering stitches around the outer edge of the yoyo. Pull the thread tight and tie off.
Repeat to make five yoyo’s. Lay to the side.
9. To make the pockets: Place the 6 ½” X 12 ½” Accent Print Pocket Rectangles and the
6 ½” x 5 ½” Accent Print Pocket Rectangles, right sides together, on the same size Insul
Shine Rectangles with the shiny sides touching the right side of the fabrics. Sew a ¼” seam at
the top of each rectangle set.
10. Turn right side out allowing a 1/8” of the shiny backing to peek above the top seam.
Top sew a seam ¼ from each pocket top.
11. Pin one yoyo on the upper left hand side of the pocket. Hand stitch the yoyo in
place. Place the White Rick Rack from the Elephants Trunk to the yoyo. Stitch the
Rick Rack in place.
12. Pin each pocket in place onto the right side bottom of the Front, Back and Side
Panels. Place the pins in the center of each so that they do not get sewn over when
building the tote body.
13. To make the Tote Side Ties:
Fold the raw edges on the 2” X WOF Accent Strip to the wrong side center. Fold again.
Top stitch the folded edges together the entire length. Fold in half and cut in half. Repeat to
get four ties.
14. Pin one end of each of the ties 4” up from each of the front and back panel pocket
tops.
Building the Tote Body
1. With right sides together, sew a 5 ½” X 12 ½” Main Print Rectangle to the right hand
side of the 12 ½” Main Print Square. Sew the remaining 12 ½” Main Print Square to
the right hand side of the 5 ½” x 12 ½” Rectangle. Repeat by sewing on the last
5 ½” X 12 ½” Main Print Rectangle to the right hand side.
2. With right sides together, place the 5 ½” X 12 ½” Main Print Rectangle (Tote
Bottom), right sides together on the bottom of the first 12” panel. Sew in place.
Leave the needle inserted, rotate the bottom and sew the 5 ½” end in place on the
bottom of the side panel. Leave the needle inserted and rotate the tote bottom. Sew
the long seam in place. Leave the needle inserted, rotate the bottom and sew the final
bottom seam in place. Remove the sewn body of the tote from the sewing machine.
Trim all threads. Refer to Diagram
3. Place the side seams right sides together and sew the side seam. Turn right side out.
4. Repeat Steps #1 and #2 to sew the Insul Shine Lining. Do not turn right side out.
5. Place the lining inside the body of the tote. Line up the seams and turn the lining top
and the outer body top under ½” to the front. Stitch in place.
6. To make the tote handles: Press one long edge of the 5 ½” X WOF Strip under ¼” the
entire length. Place the 2” X 40” batting strips down the center on the wrong side of
each of the handle strips. Fold the pressed folded edge over the raw edge of the fabric
down the center of each handle. Sew the folded edge in place.
7. Fold the sides of the handle together and sew together leaving a 5” space at each end
unsewn.
8. To make the ends of the handle pointed, sew a ¼” from the outer edge to the folded center.
Trim the seam leaving only a scant seam. Carefully turn the ends right side out to the back.
Repeat on the remaining end. This will create a pointed end on each handle.
8. Pin the ends of one handle onto the Front Panel of the tote. Machine sew a large X
onto the handle bottom to hold the handle onto the tote. Repeat to attach the handle on the
Back Panel top.
9. Place a Yoyo onto the X on each handle and hand stitch each Yoyo in place.
10.Tie a knot onto the ends of each tie. Tie the ties into a bow.
Layout Diagram of Tote Panels and Bottom


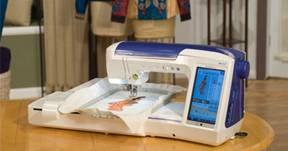
Sewing Machine Featured in this Segment:
Quattro 2 – 6700D - Sewing, Quilting, Crafting and Embroidery Sewing Machine
With Walking Foot
For more information visit:
www.thimblecottage.com |